Frequently asked questions
-
Tips on choosing a cooker hood
-
How do I choose the correct cooker hood?
-
Our helpful wizard will take you step by step through the process of choosing the right cooker hood to create your dream kitchen.
-
-
How wide should my cooker hood be?
-
Cooking vapours do not rise straight up but fan out over an angle of between 10 and 15 degrees. Choose a wider model so that cooking fumes are extracted effectively.
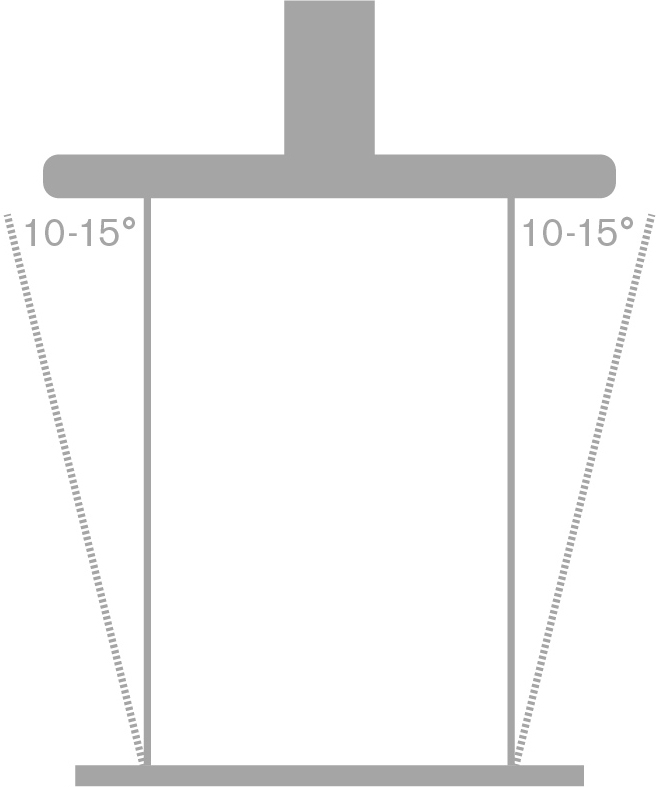
For a good result the cooker hood must be at least the full width of the hob. The maximum height of your cooker hood also plays a role.
-
-
What are the elements on the energy label for cooker hoods
-
Since 1 January 2015 cooker hoods have an energy label, with the exception of recirculation cooker hoods and cooker hoods without a motor. Novy adds extra criteria, which are even more important when choosing the right kitchen ventilation solution.
Novy introduces EcoSmart: a series of models that use energy even more efficiently.
 As a specialist, Novy supports the trend towards appliances that use less energy. As a manufacturer we have pushed back the boundaries to achieve this, without sacrificing the basic requirements for a cooker hood: it must remove all odours and cooking fumes effectively and quietly.
With the EcoSmart label Novy has introduced a wide range of products that use up to 85% less energy. With an energy-saving motor which is also extra quiet and LED lighting, the level of energy consumption when the cooker hood is in operation has fallen drastically. All products with an EcoSmart label score A or A+ for energy efficiency.
-
-
How does peripheral extraction work?
-
The cooker hood is fitted with a peripheral extraction system. This means that extraction is concentrated at the edges of the cooker hood. This results in a faster air flow and improves the extraction output.
-
-
How do I choose the correct cooker hood?
-
How to use cooker hoods
-
My cooker hood suddenly turns on or off
-
The remote control is pre-programmed and linked to your cooker hood. Sometimes it may happen that there is interference on your frequency from other broadcasters (for example the neighbour’s cooker hood, the garage door etc.) If this happens, you need to set the remote control to a different code. There are 10 codes available in all. View the demonstration video below or follow the instructions provided below.
Step-by-step instructions to change the code on the remote control
1. Determine which code is used:
Simultaneously press on/off and illumination button . The light on
the remote control will flash as many times as the
selected code.2. To change the code:
- Simultaneously press the on/off and illumination buttons on the remote control (for about 3 seconds).
- The green light on the remote control will flash
as many times as the selected code. If you want a different
code, repeat this step again (1x flashes
for code 1, 2x flashes means code 2 etc. There
are 10 codes available all. - Simultaneously press the extractor hood and (about 10
seconds).
The second green indicator light on the extractor hood
flashes (release the buttons when it does so). - Within 10 seconds press the
button on the remote control to set the confirmation.
-
-
How do I reprogram the InTouch connection between my cooker hood and hob?
-
It is important to link the remote control to the cooker hood first. The step-by-step instructions for this can be found here.
You can view the method for reprogramming the InTouch connection on the instruction video below or by following the step-by-step instructions below:
Step-by-step instructions for reprogramming the InTouch connection:
- Connect the hob to the mains.
- Simultaneously touch the on/off and lighting buttons on the induction hob until you hear a beep. The hob will now automatically search for a code. Wait until the light on the cooker hood flashes OR you hear about eight beeps from the cooker hood.
- Touch the lighting button on the induction hob until you hear a beep to confirm the link between the two appliances.
- You can now operate your cooker hood from your Novy induction hob.
-
-
What should I do if all the lights of my cooker hood are flashing?
-
After 20 cooking hours, the lights on the controls of your cooker hood flash. This indication indicates that the grease filter needs to be cleaned.
What this indication looks like depends on your type of cooker hood or hob with integrated extraction:PURELINE PRO/ CLOUD/ MOOD/ PHANTOM
Pureline Pro
Cloud
Mood
Phantom
Indication
Green indicator light illuminates.Accessing the grease filter
Grasp the bottom plate at the left and right ends and pull it downwards. You can now remove the metal grease filter by pulling the hook located on the filter. With Novy Mood, the 2 side panels can be opened. You can remove the grease filters one by one. There are 2 grease filters behind each panel.Cleaning the grease filter
The metal grease filter can be cleaned by hand or in the dishwasher. We recommend cleaning the grease filter by hand. For even more detailed information, please refer to your appliance's operating instructions.Replacing the grease filters
Before replacing the grease filter, clean the edges of the section in the cooker hood where the filter is inserted. Take hold of the filter with 2 hands. Insert the back of the filter into the opening, then push the filter up at the front and make sure it clamps in place.Reset cleaning indicator grease filter via remote control
When you replace the grease filter after cleaning, simply press the [+ ] and [- ] buttons simultaneously for 5 seconds to reset the cleaning indicator. If you do not do this, the green indicator light will remain on when the cooker hood is switched on.Reset cleaning indicator grease filter via Novy Connect app


PURELINE/ MINI PURELINE/ CRYSTAL/ FLATLINE/ TELESCOPIC
Pureline
Indication
4 flashing indicator lights.Accessing the grease filter
Grasp the bottom plate at the left and right ends and pull it downwards. You can now remove the metal grease filter by pulling the hook located on the filter.
Cleaning the grease filter
The metal grease filter can be cleaned by hand or in the dishwasher. We recommend cleaning the grease filter by hand.Replacing the grease filters
Before replacing the grease filter, clean the edges of the section in the cooker hood where the filter is inserted. Take hold of the filter with 2 hands. Insert the back of the filter into the opening, then push the filter up at the front and make sure it clamps in place.Reset the replacement indicator
When you replace the grease filter after cleaning, simply press the button 2 for 5 seconds to reset the indicator. If you do not do this, the indicator lights will continue to flash when the cooker hood is switched on.FUSION (PRO)/ VISION
Fusion (Pro)
Vision
Indication
4 flashing indicator lights.Accessing the grease filter
On Fusion (Pro), open the tilt flap to its maximum position. On Novy Vision, grasp the glass plate at the bottom left and right and pull it forward. Open the glass plate to reveal the grease filter. Protect the hob each time. You can remove the filter from the cooker hood by opening the lock and pulling the filter downwards. The filter then comes loose from the cooker hood.Cleaning the grease filter
The metal grease filter can be cleaned by hand or in the dishwasher. We recommend cleaning the grease filter by hand.Replacing the grease filters
Before replacing the grease filter, clean the edges of the section in the cooker hood where the filter is inserted. Take hold of the filter with 2 hands. Insert the back of the filter into the opening, then push the filter up at the front and make sure it clamps down.Reset the replacement indicator
When you replace the grease filter after cleaning, simply press the [-] button for 5 seconds to reset the indicator.
PANORAMAIndication
Led next to lights up.
Cleaning and replacing the grease filter
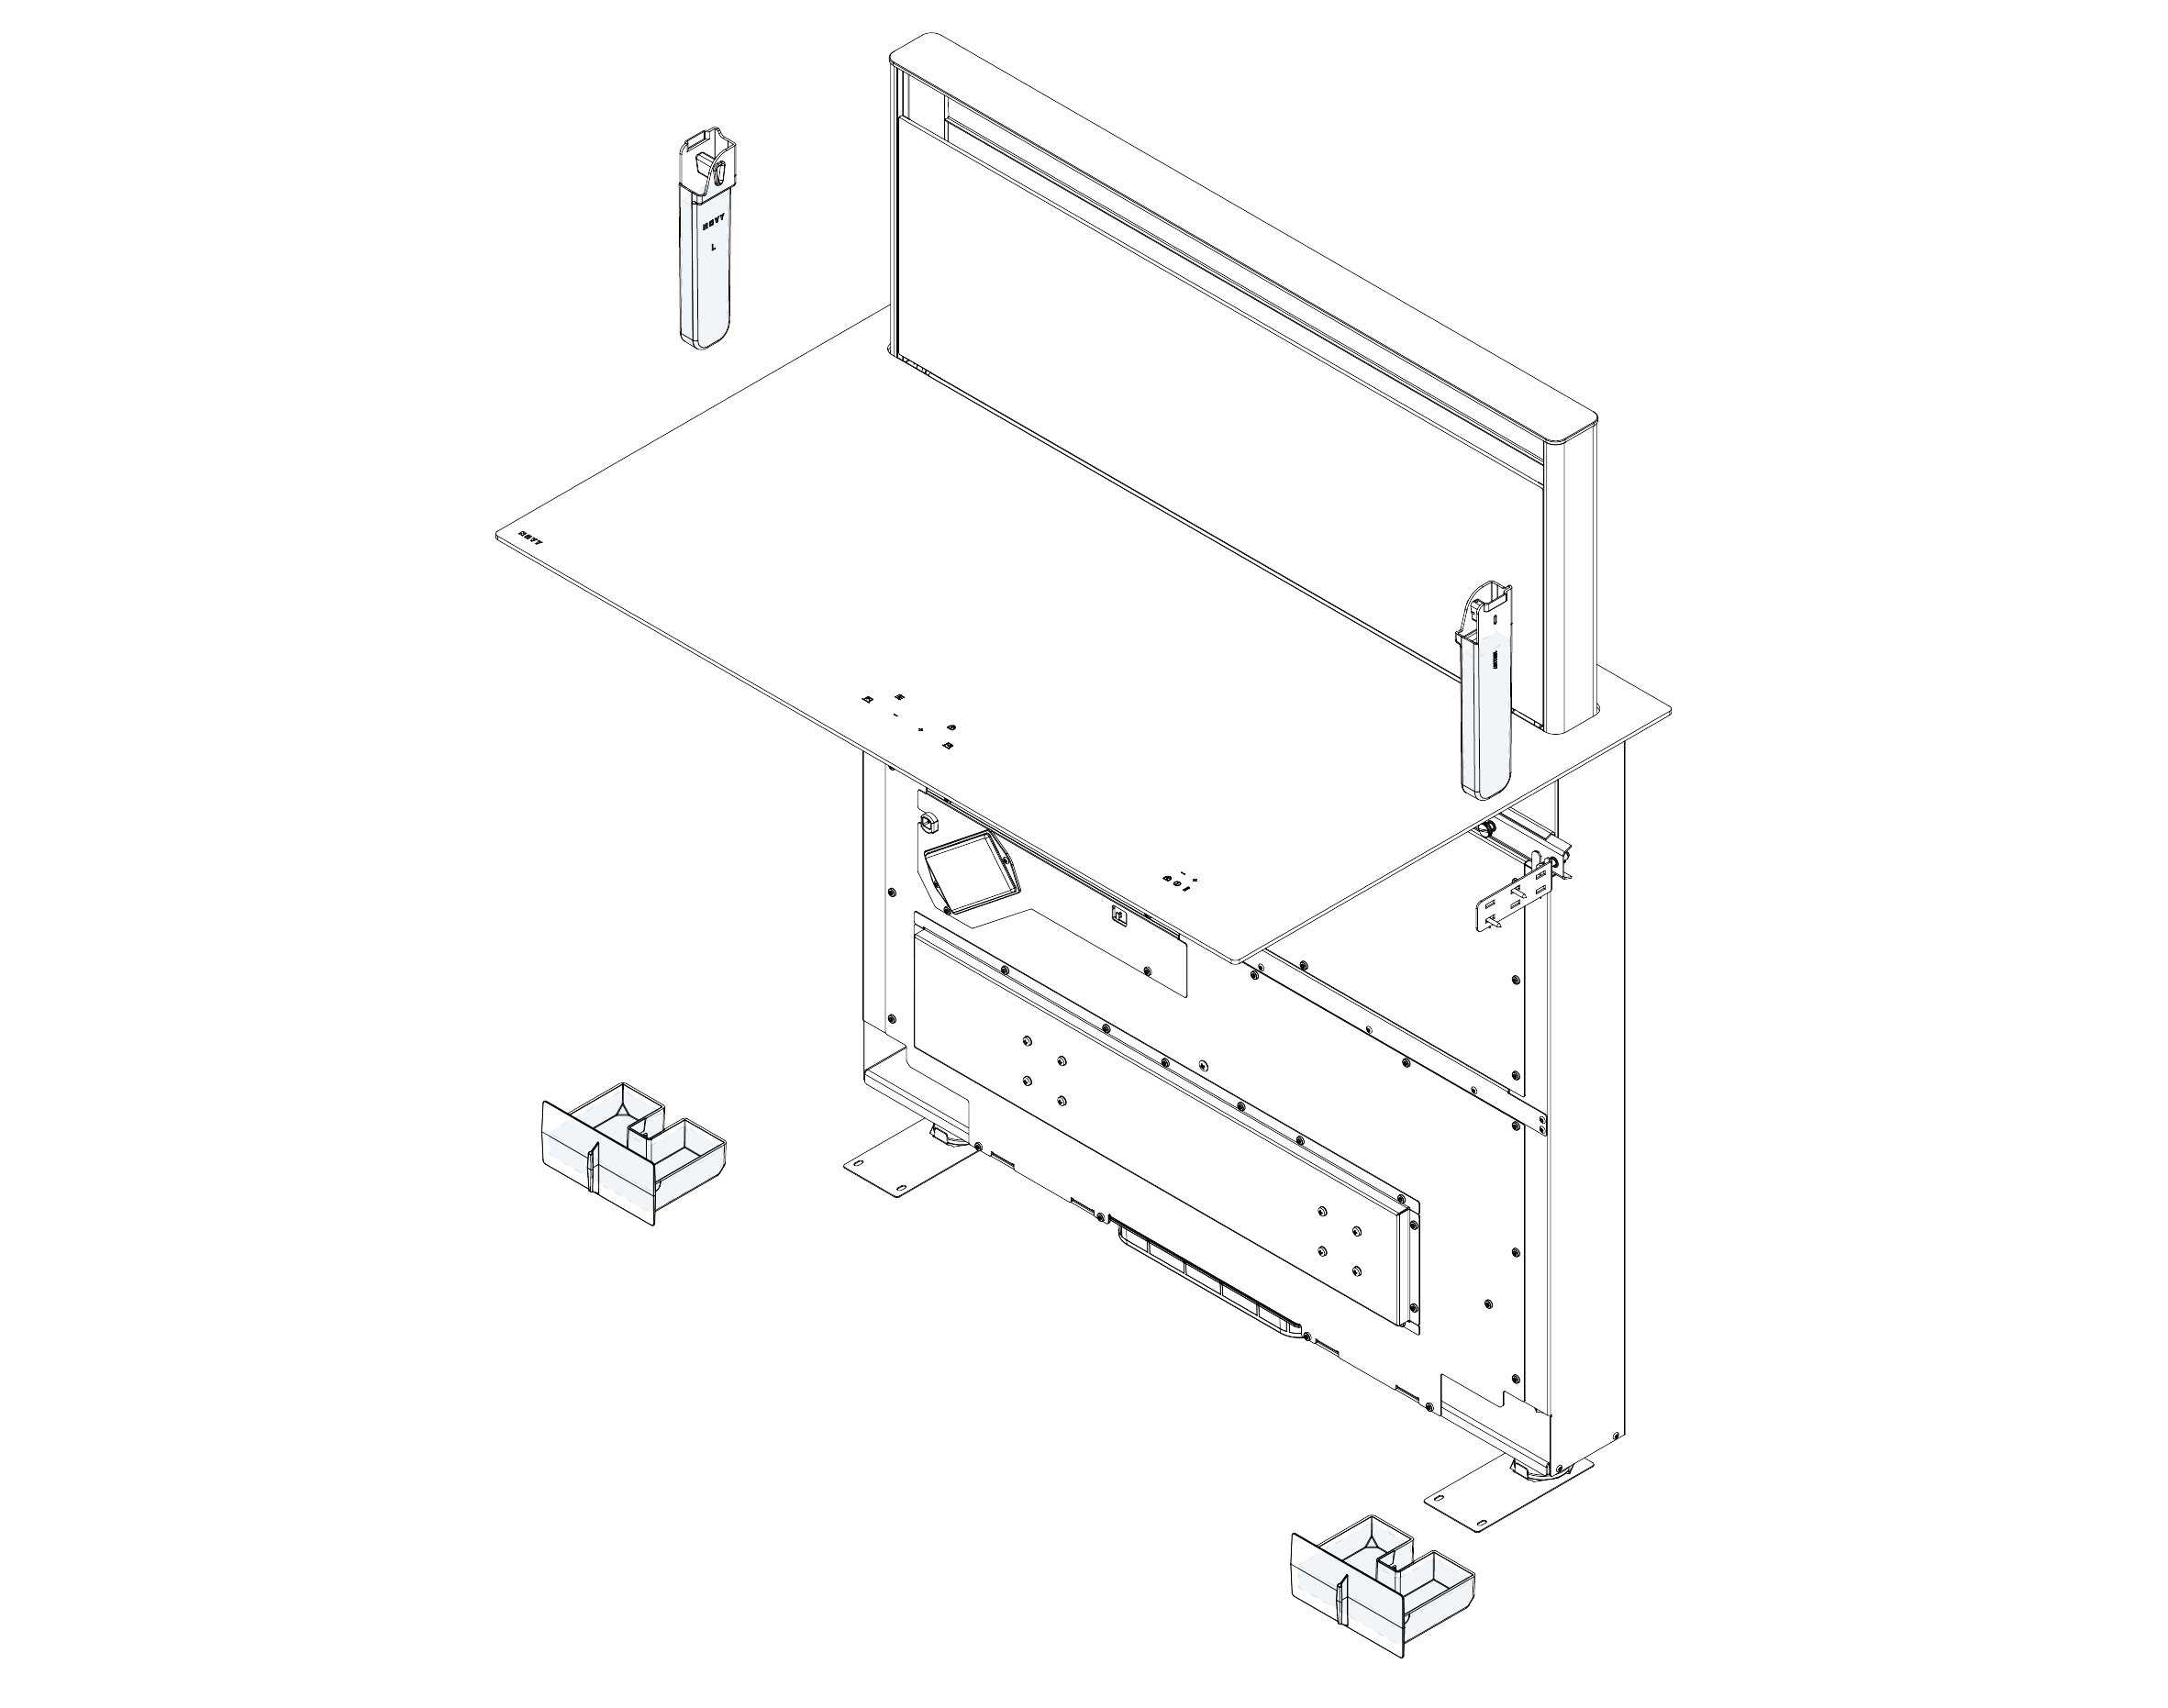
Follow steps described in your user manual. Remove the grease filters from the extraction tower (observe the position of the grease filters, there is a left and a right grease filter). Remove the collection guard from the appliance and clean if necessary. If large amounts of moisture spill, slide the lower collection containers out of the bottom of the extraction tower and clean if necessary. Follow the steps in reverse order to make the appliance ready for cooking again. When replacing the sump guard, the short side should face the front of the sump guard.
Press after replacing all parts in the extraction tower.
Reset the grease filter indicator
After cleaning and replacing the grease filters, reset the cleaning indicator. Reset: press the button for 3 seconds when the extraction tower is fully closed.Reset cleaning indicator grease filter via Novy Connect app:


EASY
Indication
After 20 cooking hours, the following message appears on the timer display: GrE 00h.Cleaning and replacing the grease filter
Remove the inlet grille. Grasp the grease filter via the handles and lift it out of the intake opening. Insert the grease filter back into the intake opening via the handles in the correct direction. Insert the inlet grille back into the intake opening.
Reset the grease filter indicator
Press the zone selection key of the extractor. Press above the suction zone selection key. Press 00h for 3 seconds until it changes to 20h. Then press 20h again for 3 seconds to confirm.
Easy 65 cm
Easy 80 cm (v4)
Easy 80 cm (v5)
Easy 90 cm Prestige
UP
Indication
4 LEDs of the extraction tower control flashingCleaning and replacing the grease filter
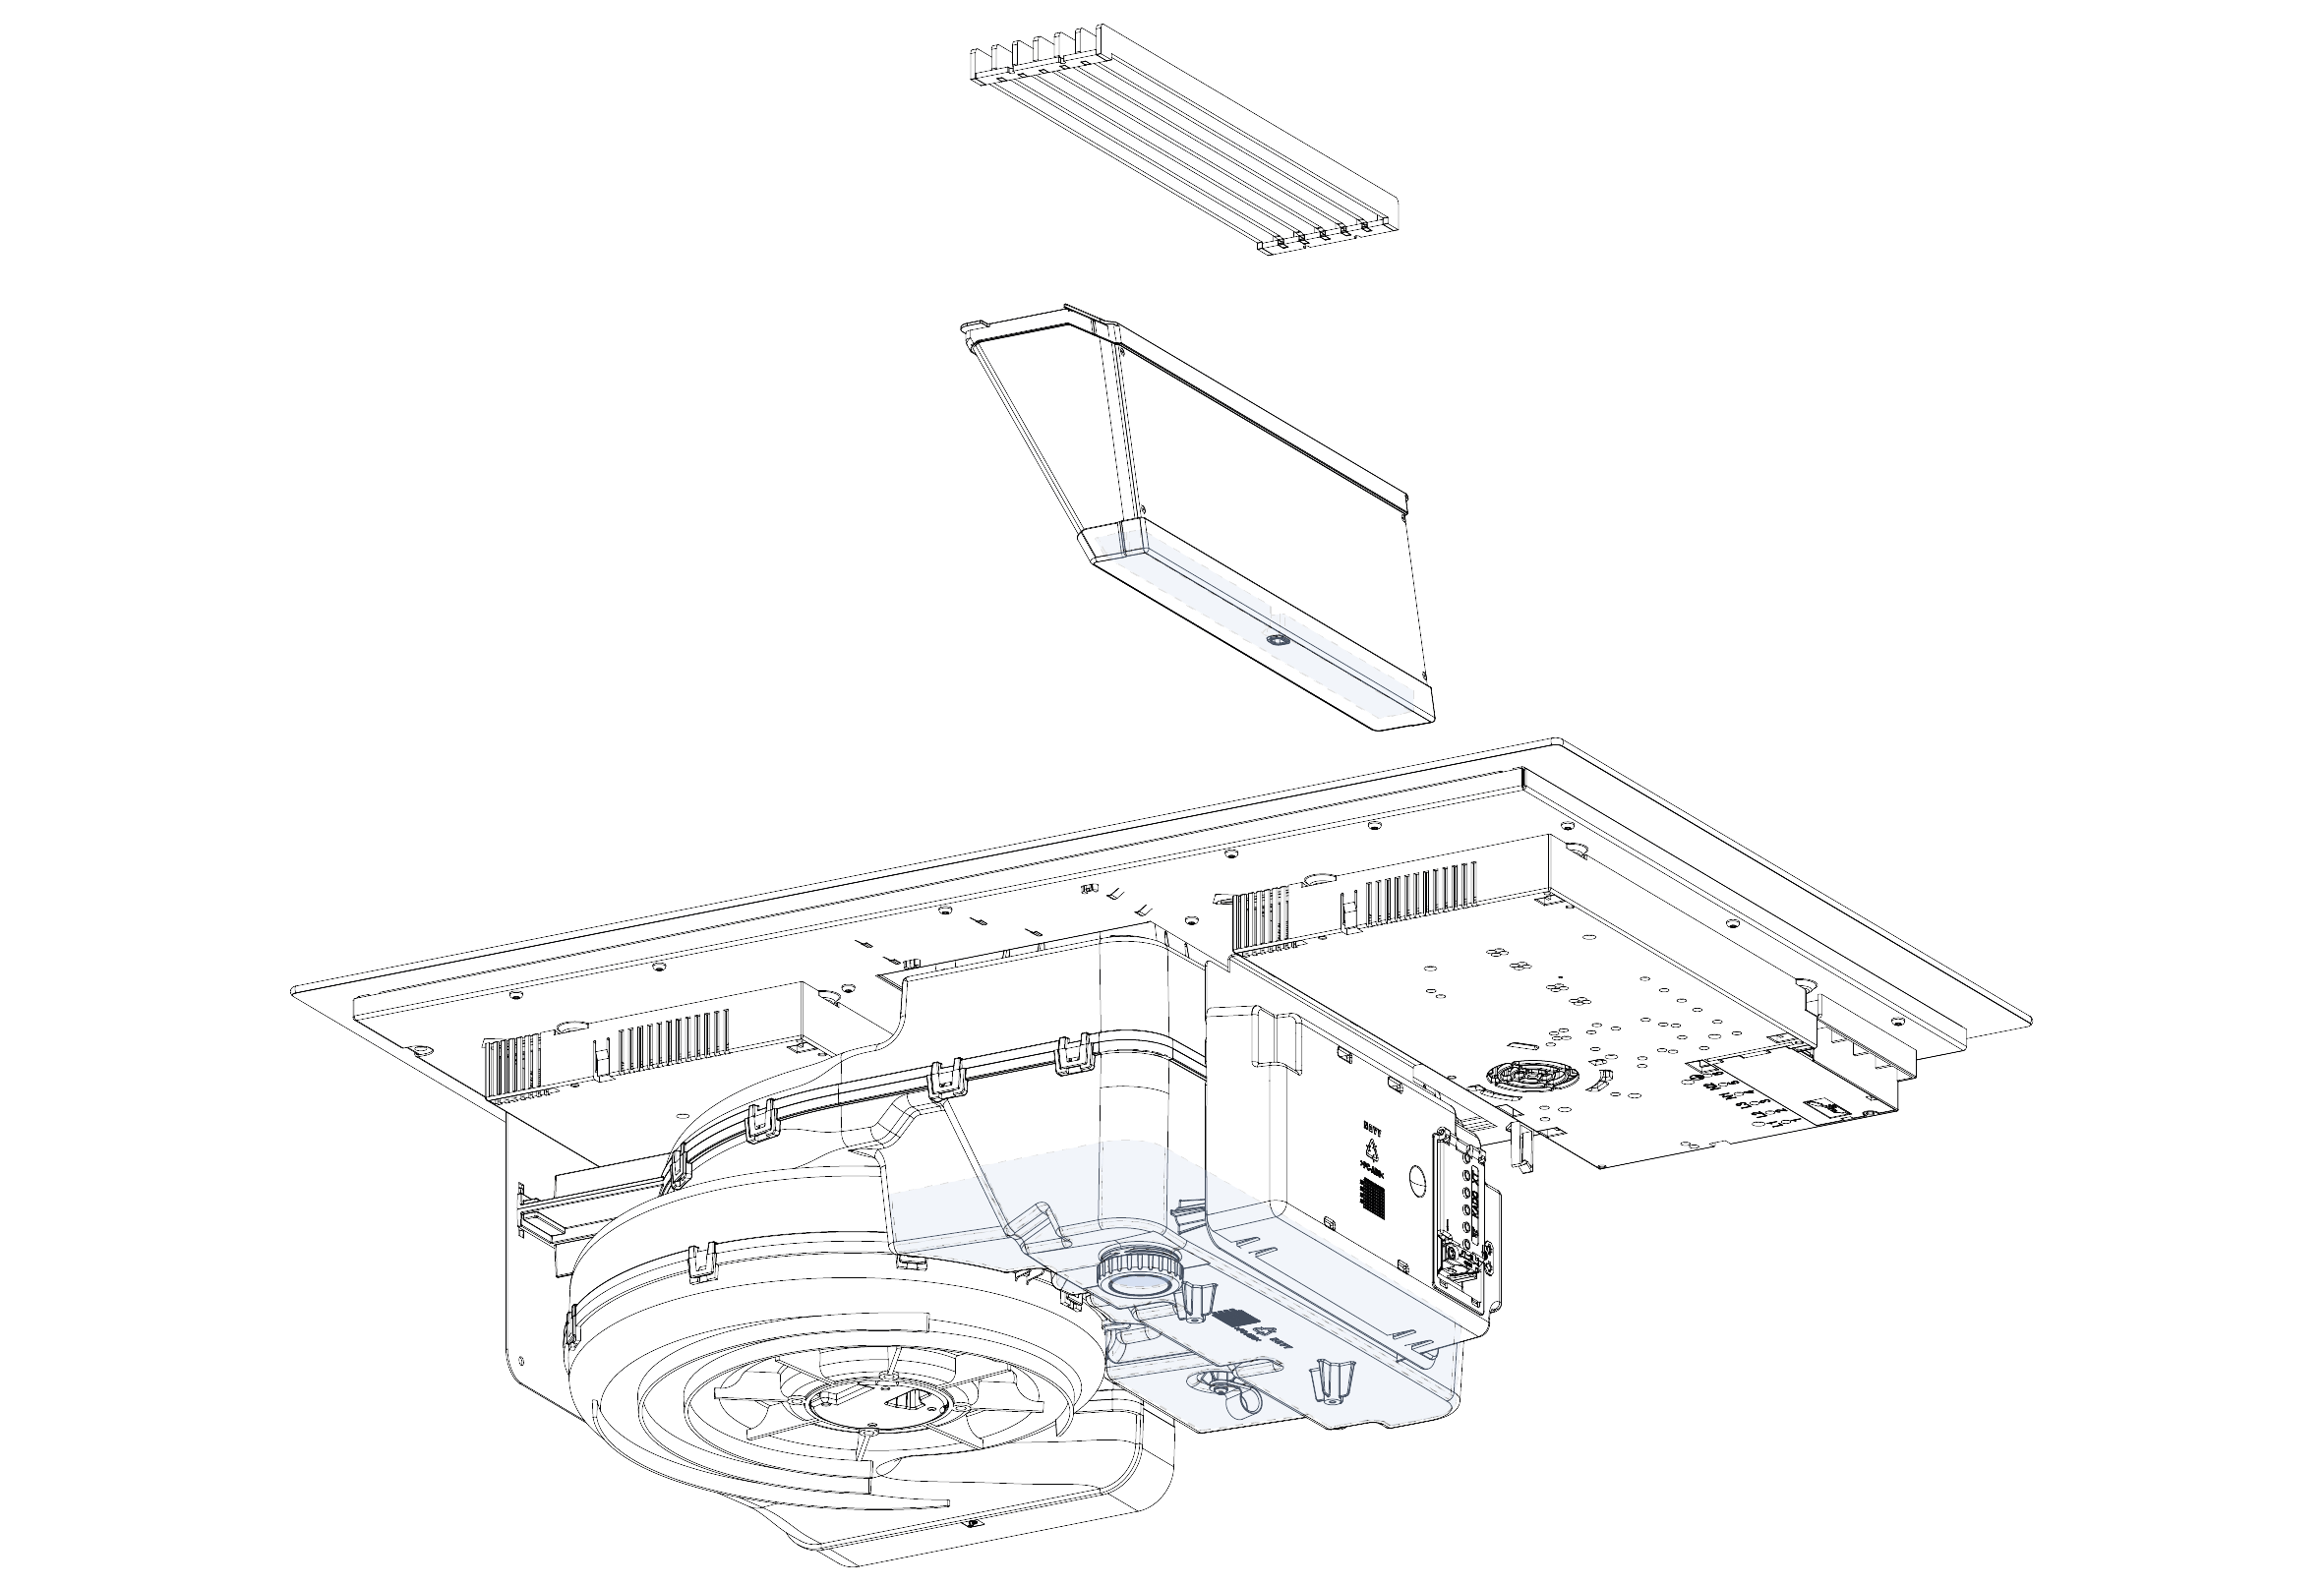
The grease filter is located in the extraction tower, the entire tower can be cleaned in the dishwasher or manually if required, along with the grease filter. The grease filter can also be taken out of the extraction tower separately for cleaning, follow the steps below. If liquid has entered the extraction opening, it will be collected in the fixed reservoir (150ml capacity). Remove the extraction tower from the lift system. Clean/remove the contents in the fixed reservoir with a cloth. Place the extraction tower back into the lift system.Reset the grease filter indicator
After cleaning and replacing the grease filters, reset the cleaning indicator. Reset: press the following button for 3 seconds.
-
-
Why does condensation sometimes occur while cooking?
-
Condensation during cooking occurs when warm, moist air from your pots comes into contact with cooler surfaces, such as the kitchen backsplash or the extractor hood itself. This is a natural phenomenon and cannot always be completely avoided.
How Can I Reduce Condensation?
Here are some simple steps to minimize condensation:
1. Turn on the extractor hood in time and use the post-ventilation function
Switch on the hood before you start cooking to ensure a constant airflow that immediately removes moist air. After cooking, it’s recommended to let the hood run for an additional 10 minutes. Novy extractor hoods come with a built-in post-ventilation function.2. Use the appropriate power setting
Adjust the hood’s suction power to match the intensity of your cooking. For heavy cooking vapors (e.g., when boiling pasta or stir-frying), a higher setting is required.3. Use lids on your pots
Cooking with lids limits the amount of steam released into the air. Whenever possible, position your pot with its lid directly under the center of the extractor hood.4. Cook at lower temperatures
Cooking at high temperatures generates more steam and increases the likelihood of condensation. Start with high heat to quickly reach boiling point, then reduce the temperature to maintain it. This not only reduces the amount of steam but is also a more energy-efficient way to cook.5. Use the right cooking zone for high-vapor dishes
Place pots that produce a lot of steam on the front cooking zones. This helps prevent condensation on the backsplash, as the steam is extracted more quickly by the hood.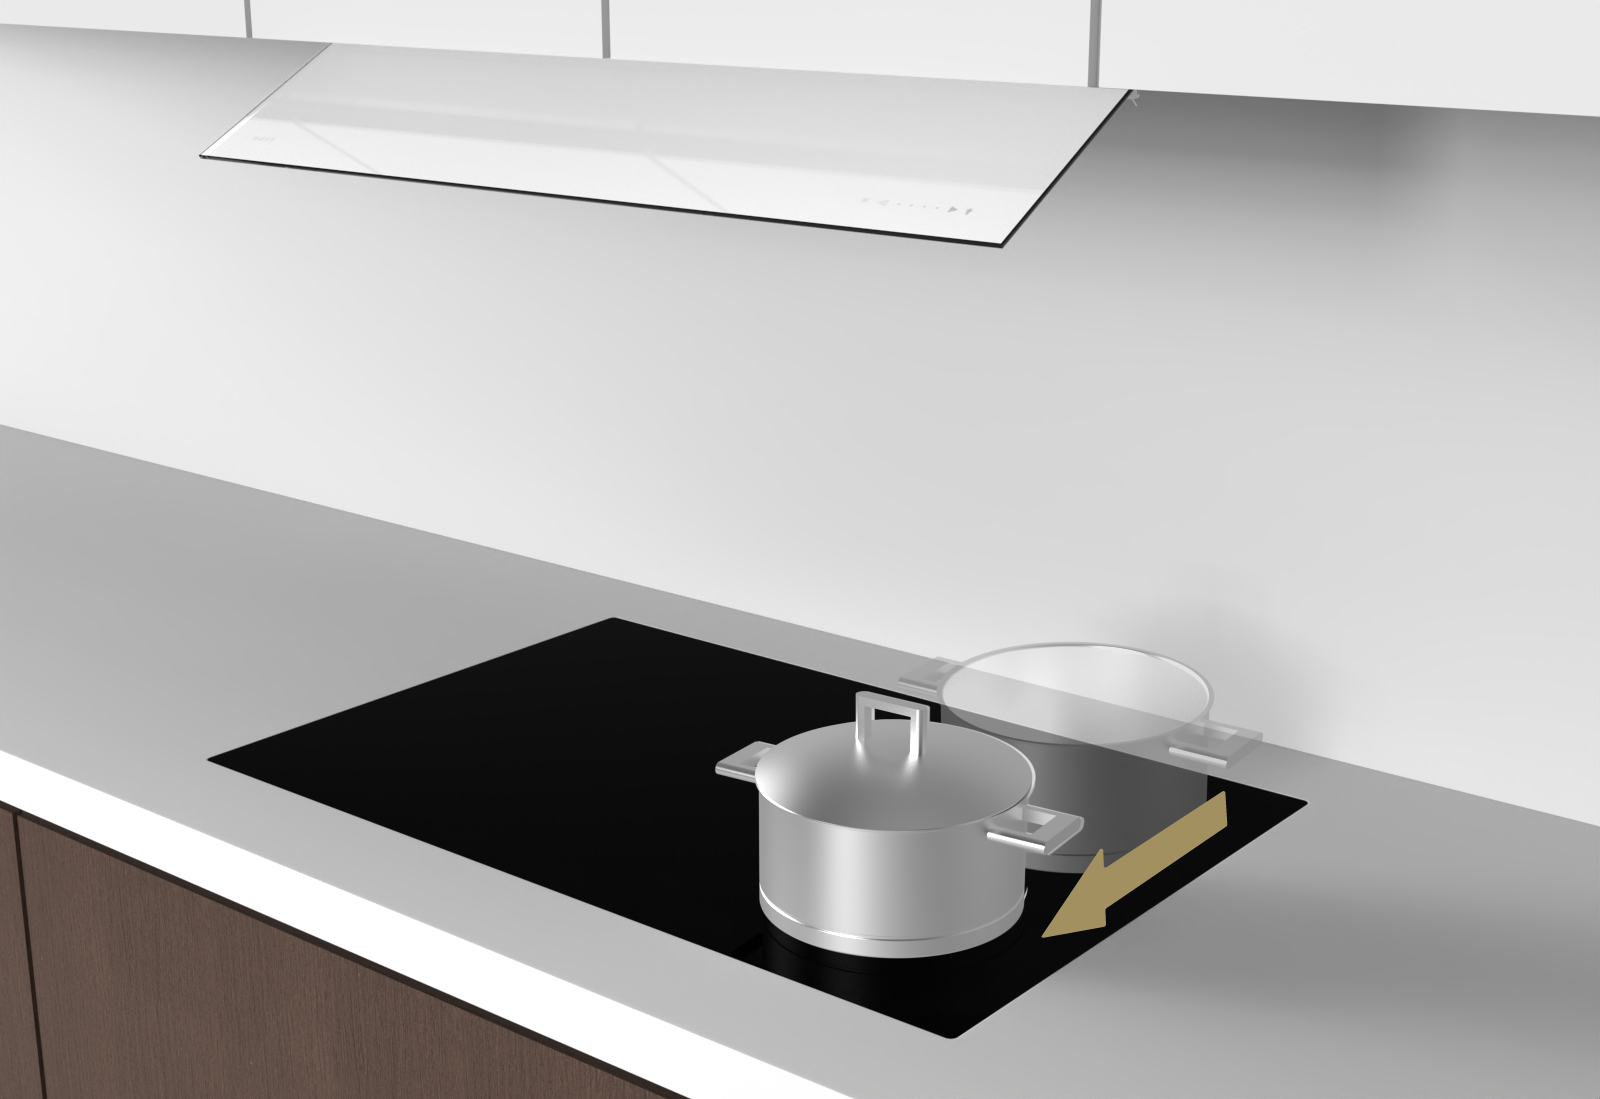
6. Keep the kitchen well-ventilated
Ensure a supply of fresh air by opening a window or using ventilation grilles or a system, especially if you’re using a recirculating extractor hood. A hood operates more effectively in a space with adequate airflow.My extractor hood works well, but I still experience condensation. What should I do?
Even with a perfectly functioning extractor hood, condensation cannot be entirely avoided due to temperature and humidity differences in the kitchen. If you notice excessive condensation, check:
- whether the hood’s grease filter is clean.
- whether airflow is blocked, for example, by a clogged or narrow duct.
- whether the maximum distance between the hood and the worktop has been exceeded.
If you’re unsure about the installation or operation of your extractor hood, contact our after-sales service. We’ll work with you to find a solution and determine whether an inspection is necessary.
With these tips, you can enjoy a better-ventilated kitchen and a more pleasant cooking experience!
-
-
My cooker hood suddenly turns on or off
-
Maintenance of cooker hoods
-
What is the best way to clean my cooker hood?
-
A Novy cooker hood is easy to maintain if you remember the following:
- For regular maintenance:
- Use a damp and dry cloth to clean surfaces.
- Use warm water and a mild cleaning product.
- Do not use aggressive, abrasive or chlorinated products.
- Dry the surface afterwards with a dry cloth.
- Once every two to three months:
- After step 1 we recommend a Novy stainless steel cleaner for optimum cleaning of the stainless steel cooker hood.
- This is a soft nourishing mousse that leaves no traces of grease and is easy to use.
- It is recommended to apply the mousse to a damp cloth and then wipe the whole surface being cleaned using a circular motion.
- Afterwards, shine with a dry cloth.
If you use another stainless steel cleaner, we recommend testing it on the inside first and leaving for 24 hours. If there is no reaction, you can clean your cooker hood using this product.
-
-
How should I maintain my recirculating cooker hood?
-
Maintenance of the monoblock recirculation filter
A recirculating cooker hood is the perfect solution for kitchens without an extraction option. To ensure your ductless cooker hood continues to perform optimally and effectively neutralizes cooking odors, it's important to follow these 4 essential maintenance and usage tips.
To determine which type of recirculation filter is in your cooker hood, please refer to the overview below:
The Monoblock 3.0 is the successor to the Monoblock Pure 2.0 and Monoblock (1st generation). When replacing, the carbon filters from the Monoblock Pure 2.0 and Monoblock (1st generation) can be easily replaced with the Monoblock Pure 3.0. A new monoblock filter can be purchased at one of our specialist retailers.
Product purchased after 31 December 2019- Lifespan of 3-5 years:
Under normal cooking conditions the monoblock filter needs to be replaced after 3 to 5 years or 900 hours of cooking.
Product purchased after 31 December 2018- Clean annually:
Almost all cooker hoods have a cleaning indicator that lights up after 400 hours and indicates that the monoblock filter needs to be regenerated. The filter can be cleaned up to 6 times. This ensures a long service life of the filter. To regenerate the filter, place it in the oven at 100-120°C for 1 hour. - Lifespan up to 6 years:
After about 6 years (depending on the intensity of cooking) the monoblock filter needs to be replaced.
Product purchased before 31 December 2018
- Clean every 5 to 6 months
Almost all cooker hoods have a cleaning indicator that lights up after 200 hours and indicates that the monoblock filter should be regenerated. The filter can be cleaned up to 12 times, which ensures a long service life of the filter. To regenerate the filter, place it in the oven at 120°C for 1 hour. - After about 3 years:
After about 3 years (depending on the intensity of the cooking process) the monoblock filter needs to be replaced.
Maintenance cartridges containing granules of active catbon
Salsa, 828, 829, 650 and 655 are fitted with cartridges containing granules of active carbon. In the case of active carbon granules the indicator lights up after 120 hours and the cartridge must be replaced.
-
-
How should I maintain my grease filter(s)?
-
The extraction capacity falls when the grease filters are saturated and do not allow as much air through.
- It is best to clean the grease filter once a month. Cooker hoods with an electronic switch indicate that the grease filter has to be cleaned after 20 hours of cooking
- Novy filters consist of multiple layers of metal mesh and are dishwasher safe.
- You can also soak the filter in hot water with soda or detergent.
- We recommend replacing the filter after about 5 years to maintain optimum results.
-
-
How do I replace the LED light on my Novy (Mini) Pure'line cooker hood?
-
- Replacing the LED light from a Novy Pure'line cooker hood
- Replacing the LED light from a Novy Mini Pure'line cooker hood
-
-
What is the best way to clean my cooker hood?
-
How to install cooker hoods
-
I do not have any option to create an external outlet. What are the possible solutions?
-
In some homes, a cooker hood with an external air outlet is not possible or not allowed for architectural reasons. In these cases a cooker hood with recirculation is recommended.
A recirculation cooker hood is one that returns filtered cooking fumes back into the space.
Particles of grease are filtered out of the cooking fumes by the grease filter and odours are absorbed by the monoblock carbon filter.
The cooker hood does not remove the moist air, but this can be removed from the space by means of the ventilation system. It is important to remember this.View our recirculation accessories
-
-
How long can my outlet duct be?
-
We recommend keeping ducts as short as possible. However, the longer the outlet duct, the more resistance it creates and this has a greater impact on the efficiency of the appliance.
If the outlet duct is too long, you can always opt for a recirculation cooker hood or a recirculation kit for your cooker hood. This technology allows you to get rid of odours and no outlet to the outside is needed.
We have good reasons for our saying at Novy that it all starts with a cooker hood. The proper functioning of a cooker hood is partly determined by the correct installation of the appliance and it is important that you think about this at an early stage in the construction process. Well-kept outlet ducts play a crucial role in this. In order to be able to adapt the installation to your specific situation we offer a wide range of outlet ducts and other accessories.
-
-
Where is the best place to locate the motor for my ceiling unit?
-
For ventilation purposes it does not matter whether the motor is installed on the cooker hood, in the duct or at the end of the duct. The location mainly depends on the installation space available.
If the maximum installation height is 35 cm, you can keep the motor on the cooker hood. If you do not have this much installation height you can opt for the Pure'line Compact or the cubic remote motor.
-
-
Where is the best place to install the non-return valve?
-
You only need the non-return valve with a roof louvre; it is already incorporated in external louvres. For roof louvres you should locate the non-return valve as close as possible to the roof louvre.
-
-
How can I make sure my cooker hood is working optimally?
-
One important function of the cooker hood is removing cooking fumes and odours as efficiently as possible. For optimum functioning, it is important to remember the following when installing the cooker hood:
When using a circular outlet duct:
- Use smooth, non-inflammable ducts with an internal diameter equal to the external diameter of the outlet connector on the cooker hood. The cooker hood requires an outlet duct measuring Ø150 mm. Extend flexible ducts to the maximum and cut them to size.
- Do not reduce the outlet diameter. This will reduce the capacity and increase the noise level.
- When connecting to a short outlet duct it may be preferable to fit a non-return valve in the duct to prevent draughts.
- Use a hose clip or aluminium tape for an airtight seal.
- When passing a duct through the outside wall, use the external louvre.
When using a flat outlet duct:
- Use flat ducts with rounded corners and air guides in the corners. These ducts are available from Novy.
General:
- Keep the duct as short as possible with as few corners as possible along its route to the outlet.
- Avoid sharp corners. Ensure corners are rounded for good air movement.
- When passing a duct through an outside wall which is a cavity wall, make sure the outlet duct completely crosses the cavity and protrudes slightly outside.
- When passing an outlet through the roof, use a double-walled roof outlet with an adequate capacity.
- Never connect to a smoke flue.
- Ensure adequate ventilation. Fresh air can be allowed in by opening a window or external door slightly or by fitting a ventilation louvre.
Incorrect installation can result in poor extraction, more noise, condensation and other undesirable effects.
-
-
Do I need ventilation in my room?
-
Insufficient ventilationresults in a loss of efficiency. A cooker hood with an external outlet will only work optimally if the air that is vented externally is replaced by fresh air (via a louvre in the window, an open door or window, or from another room).
-
-
I do not have any option to create an external outlet. What are the possible solutions?
-
Venting hobs maintenance
-
What happens if cooking liquids spill into the extraction system of my Novy hob?
-
It may occasionally happen that cooking liquids accidentally spill into the extraction system of your Novy downdraft hob. Fortunately, Novy has taken this into account. Models with integrated extraction, such as the Novy Panorama, Easy, and Up, are equipped with collection systems that effectively capture spilled cooking liquids:- Novy Panorama:
Novy Panorama features a total collection capacity of 750 ml, divided across four reservoirs: two upper reservoirs of 125 ml each, located behind the grease filters, and two lower reservoirs of 250 ml each. These collection reservoirs are easy to clean and dishwasher-safe.
- Novy Easy 80 and Easy 90 Prestige:
Novy Easy 80 v1-v2 have a collection capacity of 250 ml, with the grease filter itself capturing 100 ml and an additional collection tray accommodating 150 ml.
Novy Easy 80 v3-... and Easy 90 Prestige boast a collection capacity of 2100 ml, with the grease filter capturing 150 ml and the optimized housing holding up to 2 liters of liquid.
These grease filters are easy to clean and dishwasher-safe.
- Novy Up:
Offers a collection capacity of 175 ml. This model is also equipped with a reservoir that efficiently collects spilled cooking liquids.
Conclusion:
There’s no need to worry if something is spilled. Spilled cooking liquids can be easily collected and removed, ensuring no disruption to the normal operation of your appliance. The integrated collection trays protect the extraction system and keep it functioning optimally. - Novy Panorama:
-
-
What happens if cooking liquids spill into the extraction system of my Novy hob?
-
Novy Undercover
-
How does the Novy Undercover induction hob work?
-
The Novy Undercover is an invisible induction hob fully integrated into a 20 mm Dekton worktop. The induction coils beneath the worktop generate an inductive current in the base of the cookware, heating it. This is comparable to traditional induction hobs. You can place your cookware directly on the worktop to cook.
-
-
Can I use any pan on the Novy Undercover?
-
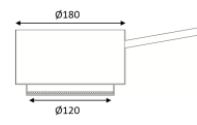
It is important to use cookware with a magnetic base, such as cast iron or stainless steel. Pans with a round base and a diameter between 12 cm and 28 cm are most suitable for optimal performance. Thin, enamelled pans (like a pancake pan) are not recommended due to the risk of overheating. As a rule of thumb, any pan compatible with induction will also work with the Novy Undercover.
Interested in elevating your induction cooking? Read our expert interview with cookware experts Beka and Berghoff.
-
-
How do I control the Novy Undercover hob?
-
The Novy Undercover is equipped with the Novy Controller, a wireless control unit included as standard. Featuring both a tactile button and an intuitive touchscreen, it lets you effortlessly manage cooking zones, power levels, timers, and more—adapting seamlessly to your cooking style.
-
-
What are the centrepoints on the Novy Undercover for?
-
The centre points indicate where the centre of the cooking zone is located and where the cookware should be placed for optimal positioning.
-
-
What worktop material is compatible with the Novy Undercover?
-
The Novy Undercover is exclusively designed for use with a 20 mm thick Dekton worktop by Cosentino. This material is durable, scratch and heat-resistant, and easy to clean.
You can choose from over 40 Dekton finishes: link.
-
-
Can I use other materials or thicknesses for the worktop with the Novy Undercover?
-
No, using other materials or thicknesses is not recommended. The Novy Undercover has been specifically tested and approved for use with 20 mm Dekton worktops. Using other materials may negatively affect performance and safety. Additionally, the 5-year warranty will be void if other materials or thicknesses are used.
-
-
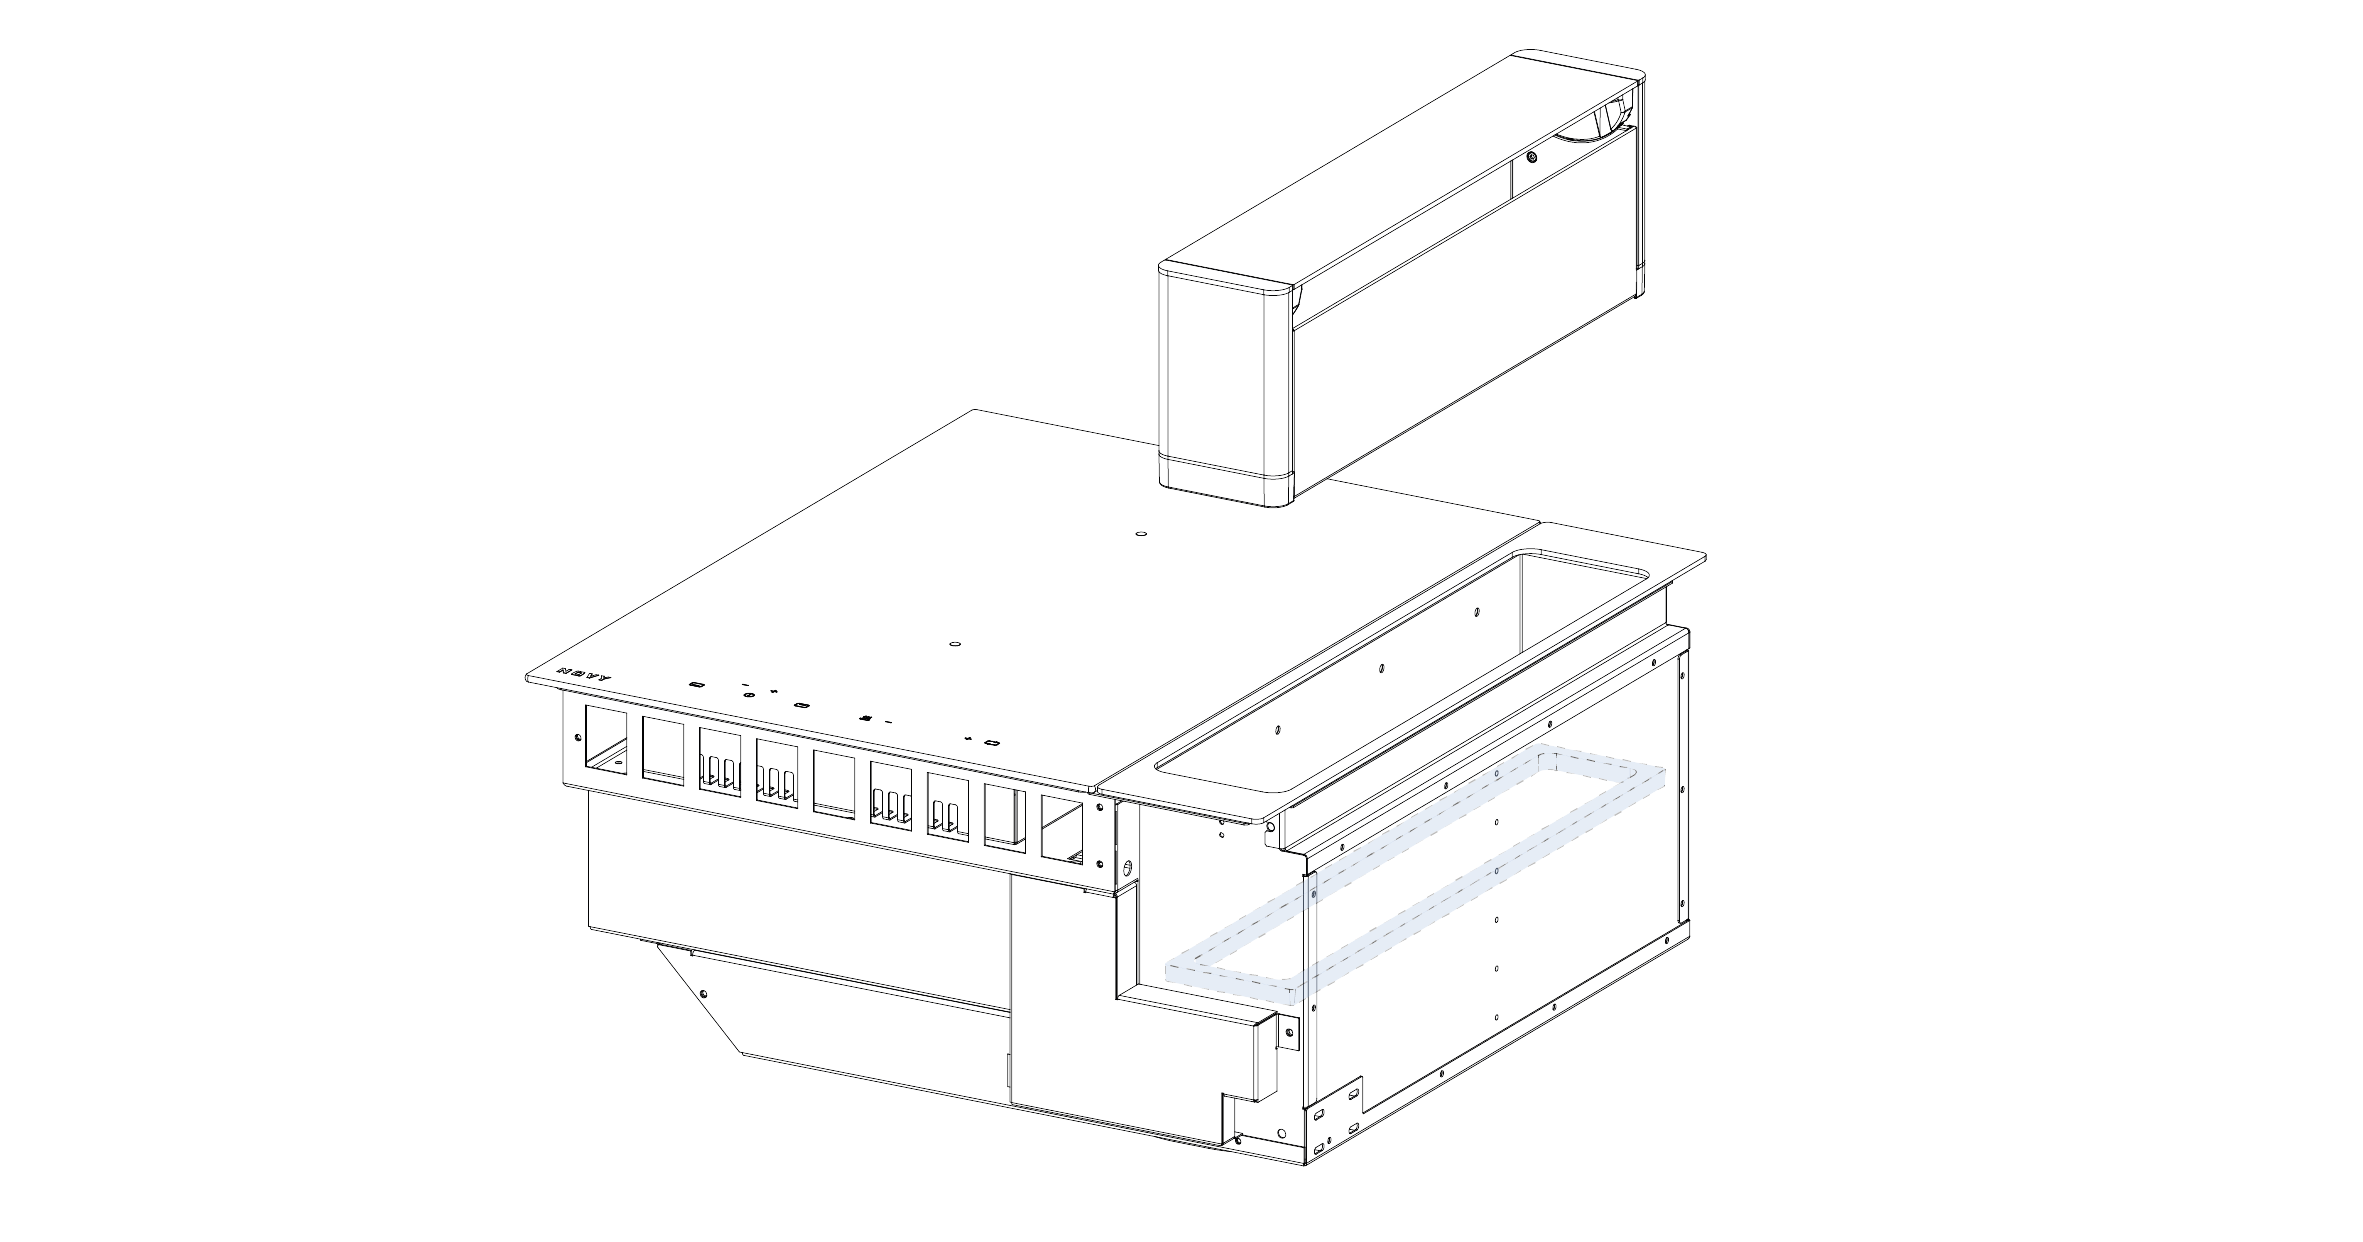
What are the minimum cabinet dimensions for integrating a Novy Undercover?
-
The Novy Undercover fits into a 120 cm wide base cabinet without a partition, with a net internal dimension of 1140-1240 mm. The worktop must be at least 1380 x 600 mm (WxD), including a 90 mm overhang on both sides.
-
-
Is it normal for the centrepoints on the Novy Undercover not to be fully flush with the worktop?
-
Yes, the centrepoints protrude slightly (0.3mm) above the worktop. This design prevents water and dirt from seeping into the worktop.
-
-
Are additional cut-outs permitted in the same Dekton worktop that integrates the Novy Undercover?
-
Yes, this is possible. A sink or power outlet, for example, can be seamlessly integrated into the same surface.Please take into account several technical requirements and specifications. These are detailed in this document (see page 10):
https://bit.ly/4dbV9q4
-
-
Who installs the Novy Undercover?
-
The installation must be carried out by a professional kitchen installer. The electrical connection should be done by a certified electrician. The worktop is pre-fabricated to size by an approved stonemason.
-
-
How is the Novy Undercover installed?
-
The induction modules are mounted beneath the worktop using a fixing system attached to the side walls of the kitchen cabinet. Note that this is only possible in cabinets of 120 cm.
-
-
How is residual heat indicated on the Novy Undercover?
-
The Novy Undercover has subtle LED indicators on the worktop to signal whether a cooking zone is still hot. Additionally, residual heat is displayed on the Novy Controller, and an optional LED indication can project this information onto the kitchen floor for added safety.
-
-
Is the Novy Undercover safe to use?
-
Yes, the Novy Undercover is designed with multiple safety features, including a hob lock, automatic shut-off, overheating protection, and residual heat indicators. These features ensure a safe cooking experience, similar to traditional hobs.
-
-
How many years of warranty does the Novy Undercover have?
-
Like all Novy appliances, the Novy Undercover comes with a 2-year manufacturer’s warranty. You can extend this warranty to 5 years free of charge by registering your product via this link.
Cosentino offers an extended manufacturer’s warranty of up to 25 years. For full details about this warranty, visit this link.
-
-
How do I maintain the Novy Undercover?
-
The Dekton worktop is scratch and stain-resistant and easy to clean with a damp cloth and mild cleaning agents. Avoid using abrasive cleaners to preserve the surface finish.
More information:

-
-
How often should I clean the Novy Undercover worktop?
-
It is recommended to clean the worktop after each use to prevent the build-up of dirt and stains, thereby maintaining the worktop’s lifespan and appearance.
-
-
Are the centrepoints of the Novy Undercover prone to scratches?
-
Over time, scratches may appear on the centre points due to daily use of the appliance. This is normal and caused by moving cookware over the centre points. Importantly, this does not impact the functionality of the appliance.
-
-
How much does the Novy Undercover cost?
-
The price of the Novy Undercover varies by country and depends on the number of cooking zones. In the UK, the price is £4,199 for three cooking zones and £4,499 for four cooking zones, including VAT.
-
-
What is the cost of a Dekton worktop?
-
The cost of the material (excluding finishing) starts between 500-700 EUR per square metre, but can vary significantly depending on the chosen colour.
Contact your local kitchen retailer or stonemason for further advice.
-
-
How does the Novy Undercover induction hob work?
-
Hobs
-
Do you need special pots and pans for induction?
-
To cook on an induction hob you need pots and pans with a magnetic base. When these are in contact with the hob, a magnetic field is created which generates heat. Only the pot or pan heats up, while the rest of the zone remains cold.
If you want to know whether your pots and pans will work with induction, you can test this by holding a magnet against the base. If it sticks, your saucepan or frying pan is suitable for induction.
Types of pots and pans:
Pots and pans that are suitable: steel, enamelled steel, cast iron, stainless steel with magnetic base, aluminium with magnetic base
Pots and pans that are not suitable: aluminium and stainless steel without a magnetic base, copper, brass, ceramic and porcelain
A few tips:
- Pots or pans that have already been used on other heat sources should be tested to ensure that the base is smooth.
- Pots or pans that are rough or have already been damaged may damage the glass
- Pots or pans must have a completely smooth base
- Some pots and pans buzz when they are placed on an induction cooking zone. That does not mean the appliance is faulty, and it does not affect their functioning at all.
Interested in elevating your induction cooking? Read our expert interview with cookware experts Beka and Berghoff.
-
-
What is the best way to clean my hob (matt or glossy) ?
-
Cleaning a glass-ceramic hob is most effective when you use the right method and products. Consistent care helps prevent scratches, lifts dirt efficiently, and ensures that both matt and glossy surfaces remain looking their best and functioning optimally for years. Regular cleaning is important to stop spills and splashes from baking on, which can lead to stubborn residue and, in some cases, permanent staining.Key difference between matt and glossy hobs:
- Glossy hob: never use abrasive products or scouring pads (risk of scratches).
- Matt hob: mild abrasives and a soft scouring pad may be used for stubborn dirt, provided they are used carefully.
Before you start cleaning your hob
For safe and efficient cleaning:
- Switch off the hob completely
- Allow all cooking zones to cool down completely
- Never use steam cleaners or high-pressure cleaners
- Avoid applying cleaning products on a hot surface (risk of discoloration)
What do you need?
For gloss hobs:
- Soft cloth or sponge
- Microfiber cloth
- Non-abrasive cleaner for glass-ceramic surfaces
For matt hobs:
- Soft cloth or sponge
- Microfiber cloth
- Mild cleaner for glass-ceramic surfaces
- Optional: soft scouring pad (for stubborn dirt)
Daily cleaning of your hobDaily cleaning prevents burnt-on residues and keeps your hob in optimal condition.
Step-by-step:
- Allow the hob to cool completely
- Remove dirt using a soft, damp cloth or sponge with a suitable glass-ceramic cleaner
- Dry with a microfiber cloth for a streak-free finish. Never use standard scouring pads or aggressive products that may cause scratches.
Important!
- Gloss: no scouring pads or abrasive products
- Matt: mild abrasives and soft scouring pads are allowed for stubborn dirt
Removing stubborn stains from your hobDull or shiny marks are often caused by limescale or burnt-in minerals and grease.
Step-by-step:
- Clean preferably while the hob is still lukewarm.
- Use a scraper suitable for glass-ceramic hobs if needed.
- Apply a suitable cleaner:
-
- Gloss: non abrasive
- Matt: mildly abrasive allowed
-
- Let the product act for about 10 minutes
- Gently rub:
-
- Gloss: with a soft spunge
- Matt: optionally with a soft scouring pad
-
- Dry with a microfiber cloth.
- Check cookware for grease or mineral residues that may re-soil the surface
Removing boiled-over food
Spilled food is best removed immediately before it burns onto the surface.
Step-by-step:
- Place a wet cloth over the stain to loosen it
- Carefully remove residues with a scraper
- Clean afterward following the daily cleaning routine
Burnt sugar or melted plasticSugar, syrup, or plastic must be removed immediately while the hob is still hot. Delaying can cause permanent damage.
Step-by-step:
- Carefully use a scraper.
- Clean afterward following the daily cleaning routine.
How to prevent scratches on your hob?To maintain a flawless surface:
- Do not use the hob as a work surface
- Lift pots and pans instead of sliding them
- Ensure cookware bottoms are clean
- Avoid sand or dirt between the hob and cookware
Discoloration or shiny spots on your hob?
Color changes or shiny spots do not affect performance or safety.
They are usually caused by:
- Burnt-on residues
- Wear from cookware bases
- Use of unsuitable cleaning products
Some stains are difficult to remove completely and may require repeated cleaning.
-
-
My induction hob makes a noise when cooking. Is this normal?
-
Noises can certainly occur when cooking on induction hobs. This is because the metal components in the base of the pot consist of multiple layers and vibrate. This usually occurs when using lower quality pots with glued bases. It differs from one pan to another and often reduces after cooking for a few minutes.
Some noises are specific to the technology, while others may be caused by the pans. Here is a summary:
Induction-related noises
Induction technology is based on the properties of certain metals when they are exposed to electromagnetic influences. As a result so-called eddy currents occur, which make the molecules vibrate. These vibrations are converted into heat. As a result, quiet sounds are made depending on the material that is used. The sound may depend on the type of base on your pan and is perfectly natural.
Humming
Humming sound like a transformer. This happens when you are cooking on a higher heat setting, and it is caused by the amount of energy being conveyed from the hob to the utensils. The sound will disappear or be quieter if you adjust the hob to a lower temperature.
Crackling soundThis sound occurs if the utensils are made from multiple layers of metal. The sound is caused by vibrations in the surfaces of the different layers of material that are in contact. This sound is caused by the cooking utensils and depends on their quality and the type of food being prepared.
Whistling soundThese sounds usually occur in cooking utensils made from multiple layers of material, and when two adjacent hobs are being used simultaneously on the maximum setting. The whistling sound will disappear or become quieter if you adjust the hob to a lower temperature.
Fan noiseTo ensure that the electronics work correctly, the temperature must not rise too high. The hob is therefore fitted with a fan, which works on different settings depending on the temperature. Even after the hob has been switched off, the fan continues to run until the temperature has sufficiently decreased.
-
-
How to determine the dimensions of your pots and pans for induction
-
- The cooking zones automatically adjust to the diameter of the pan to some extent.
- The base of the specific pot or pan must, however, have a minimum diameter (+/- 60%) in relation to the diameter of the chosen cooking zone.
- We recommend placing the pot or pan right in the middle of the cooking zone to get the best output from your hob.
- Ratio of pan diameter to element diameter

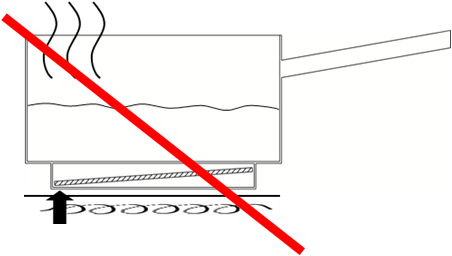
The ferromagnetic bottom is too far from the element:
- Ferromagnetism= this refers to substances such as iron, nickel and other substances that can be very strongly magnetised by quite weak magnetic forces
- This can reduce efficiency.
- The response time may be less good.
- Poor quality pots or pans:
- Water boils poorly on one side.
- The other side stays cold.
- This leads to poor cooking results.
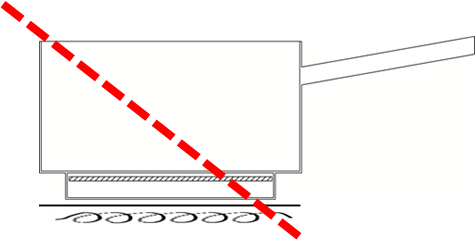
- Bottom of the saucepan is hollow or has a deep logo stamp:
- Overheating occurs in areas that do come into contact with the glass.
- Poor cooking results.
- The temperature probe measures the wrong values.
- The safety maximum of 240°C is not reached in the middle of the pot or pan (or only after a long time).
- So the base can reach temperatures of 500°C and damage the electronics.
-
-
Other problems that occur with pots and pans for induction
-
- The ferromagnetic base is too far from the element:
- Ferromagnetism= this refers to substances such as iron, nickel and others that can be very strongly magnetised by quite weak magnetic forces
- This can reduce efficiency.
- The response time may also not be as good.
- Poor quality pots or pans:
- Water does not boil well on one side.
- The other side stays cold.
- Gives poor cooking results.
- Bottom of the saucepan is hollow or has a deep logo stamp:
- Overheating occurs in the areas that do come into contact with the glass.
- Poor cooking results.
- The temperature probe is measuring the wrong values.
- The safety maximum of 240°C is not reached in the middle of the pot or pan (or only after a long time).
- So the bottom can reach temperatures of 500°C and damage the electronics.
-
-
Do you need special pots and pans for induction?
-
Serial number plate
-
Where can I find the serial number plate?
-
When you call our After Sales service on +32 (56) 36 51 02, we advise you to have the serial number plate and serial number ready.
Where can you find the serial number plate?
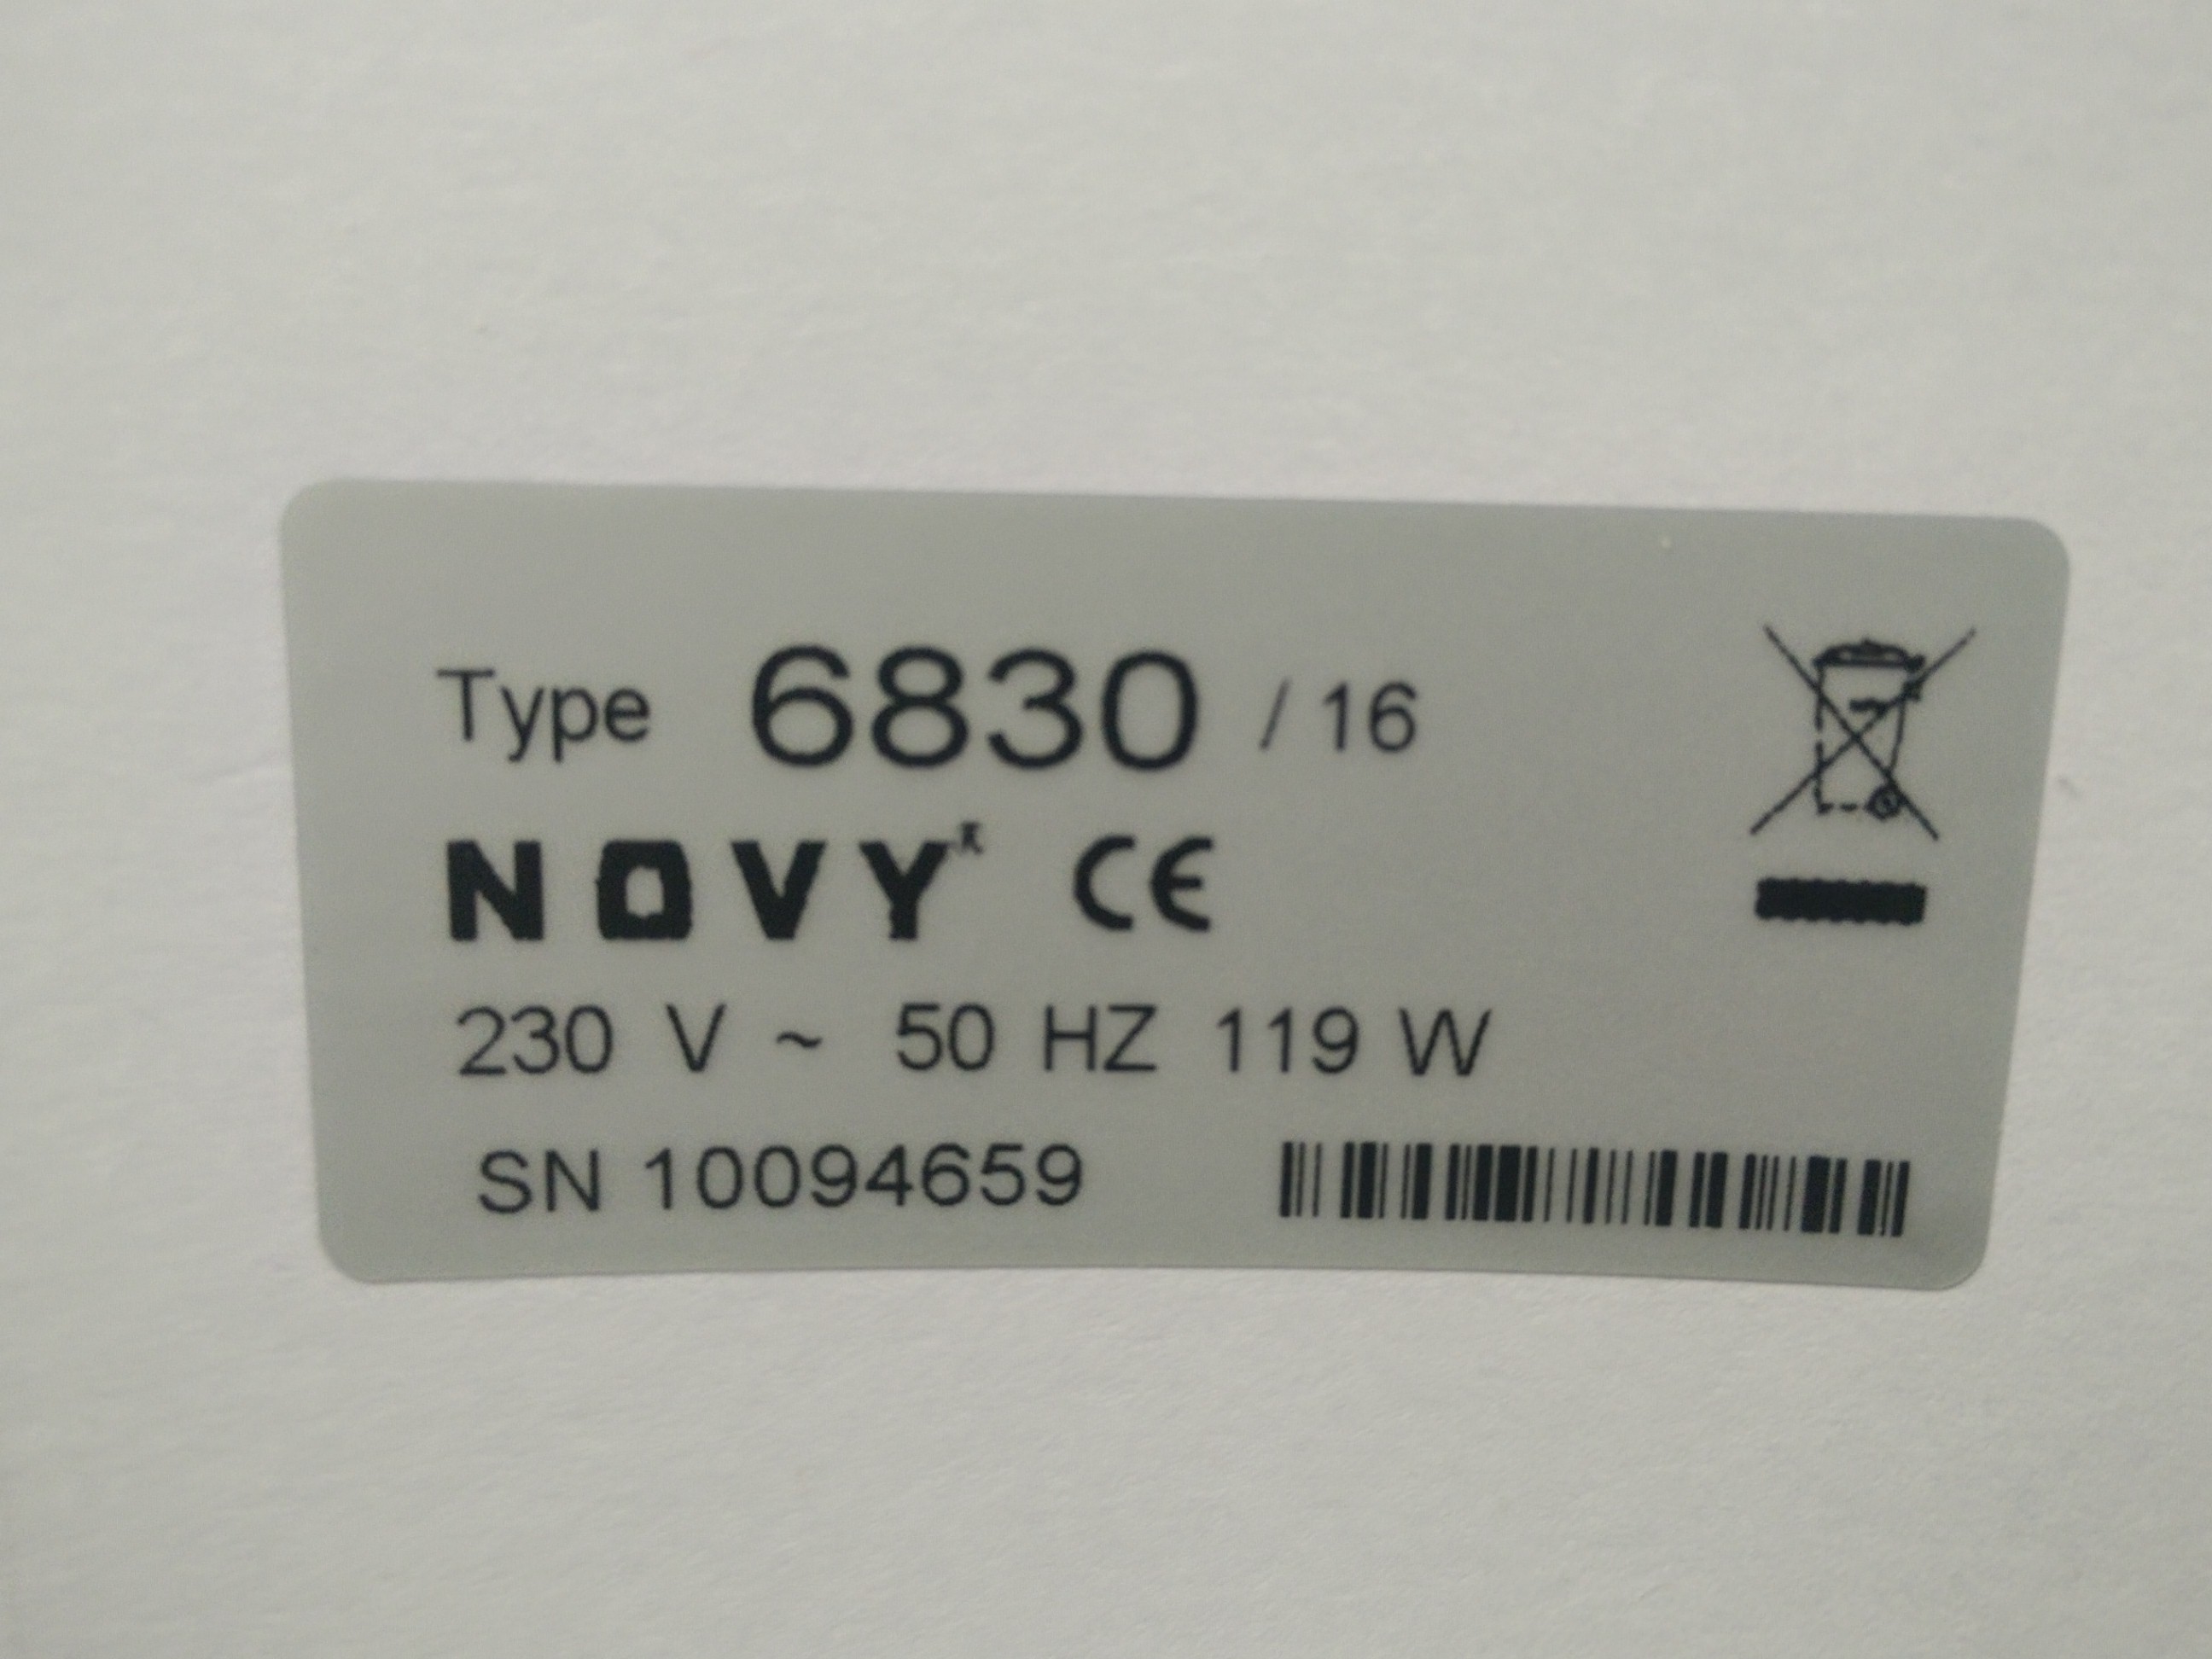

- Cooker hoods: open the bottom plate - remove the filter - you will find the serial number plate on the inside
- Hobs: the erial number plate is on the bottom of the hob
- Ovens: the erial number plate is at the back of the oven or behind the door
- Cooker hoods: open the bottom plate - remove the filter - you will find the serial number plate on the inside
-
-
Where can I find the serial number plate?